Screenshots or screen captures are very useful for various reasons. These quick pictures of the screen are used for remembering information, capturing certain steps in a procedure, sending visual information to a third party and a lot more.
There are multiple methods of taking screenshots on your iPhone. Let’s take a look at two different methods.
Method #1
The easiest way of taking a screenshot is to press and hold the Home and Power buttons at the same time.
The newly unveiled iPhone X does not come with a Home button. In this case, you have to press and hold the Volume Up button and the Side button at the same time to take a screenshot.
Method #2
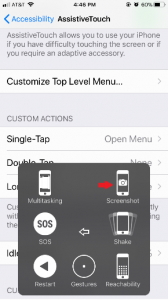
There is another way of taking a screenshot on the iPhone. It’s a little complicated and uses a new technology called Assistive Touch.
- Load the screen that you want to capture on your iPhone.
- Tap on the Settings app and open it.
- Once your Settings app is open, tap on General.
- Now, tap on Accessibility.
- Then, turn on Assistive Touch.
- Once Assistive Touch is turned on, you will see it’s shortcut on the right side of your screen. Tap on the Assistive Touch shortcut.
- Then tap on Device.
- This opens many options but, we need to tap on the three dots for More
- After the new options show up, tap on Screenshot! That’s it!
Once you take the screenshot successfully, it will be available in your Photos folder. If you want to send a screenshot via text message or email, treat it like any other image file and attach it to your message before sending.
If you found this guide useful would you please leave us a comment below to let us know this was helpful. Also why not have a look at our ipad and iphone cases and accessories while you’re here. Click here to view them.
The post How to take a screenshot with your iPhone appeared first on Campad Electronics Blog.


No comments:
Post a Comment